by Chuck Quinton
Rotary Golf Swing Takeaway |
Rotary Swing Golf |
![]() Watch Rotary Golf Swing Takeaway Video
Watch Rotary Golf Swing Takeaway Video
In the takeaway, I am primarily concerned with three things: the plane the club travels back on, the angle of the clubface and how the golfer flows the club back. The most common things I see with rotary swingers during the takeaway is a club that is very beneath the shaft plane at address, a clubface this is fanned open by the rolling of the wrists and a clubhead that is well inside the hands when the club reaches parallel to the ground caused by an overactive rear hinge of the right wrist and a rolling of the forearms. These three moves that happen very early in the golf swing throw the club off plane and cause many tendencies.
1. The first tendency is for the golfer to lose his spine angle at the top of the swing because the momentum and weight of the club traveling so far around and behind the golfer pulls him slightly off balance, so he will raise his spine angle slightly in order maintain a balanced position. From here, golfers can go one of two directions. The first will be that the golfer will lift his arms high above his head to “complete” his backswing and then tend to come down on the ball very steeply. All sorts of misses are possible from this position, from hard pulls to the left to weak slappy cuts to the right. The second direction I tend to see in the better golfer. They will tend to keep their spine angle in this position and begin to swing their arms down and more out in front of their bodies. If they clear their lower body aggressively, they will tend to come at the ball more from the inside because of the low club position and hit shots that start to the right and draw back to the target. The divots will face slightly out to the right of the target. The tendency for this golfer is to miss shots to the left when the release of the hands get flippy and overactive.
The fix for either golfer is to work on taking the club back with more passive arms and hands and keep the club more outside the hands. The first golfer needs to work on swinging their arms more across their body rather than lifting them high above their head. If they cannot do this and continue to end up with a very upright position at the top of the swing, they should develop a shallowing motion to allow for the arms to drop back down on plane during the first half of the downswing. For the second golfer, this will keep the hands from releasing so aggressively through impact. Because they have a tendency to hold on to the club too tightly, they will tend to bring the club back too far inside early on because the tension in the hands and forearms causes them to be overactive and will only increase as the swing progresses toward impact. Soft and quiet hands will allow this golfer to swing through the shot with a more passive release from the hands, providing a straighter ball flight and shallower divots.
2. For a golfer that has more spinal tilt at address, the right arm will tend to need to be a little more active to begin pulling the left arm into the body earlier on in the swing. Because of the exaggerated spinal tilt, the arms will hang further away from the body at address, therefore they will need to be pulled in somewhat actively by the right arm bending up along the side of the body, similar to the action of starting a lawnmower or sawing a log with a hand saw. For the golfer who does not have as much spine tilt at address, this action is not as dramatic and will feel a bit more natural, but the same motion in miniature can occur. If this “lawnmower action” does not occur and the arms don’t actively lift the club (which is undesirable in a rotary swing), the club will swing back very low and inside and tend to get too far behind the golfer.
Fundamental Keys for the Takeaway
Quiet Hands
The golfer should keep the arms and especially the hands relatively quiet during the first part of the swing. Far and away the most common swing fault I see is someone whose right wrist begins to hinge backward, pulling the club inside and behind the hands very early in the swing. This becomes a difficult position to recover from on a consistent basis because it requires a timed release of the hands at impact. If the golfer practices imagining their hands are in a cast for the takeaway, this will help them with a mental image of keeping the hands quiet.
Right Elbow
The right elbow should work slightly up and back, similar to starting a lawnmower
in this part of the swing or using a hand saw to saw a piece of wood. Ideally
when the club reaches parallel to the ground, you have some bend in the right
elbow compared to an upright swing takeaway where the arms would both be straight
and extended away from the body. This extension of the arms and club away
from the body is what creates extra width in the two plane swing and keeps
the club in front of the body.
The Club
When the club reaches parallel to the ground, it should be pointing toward
your target and still be just outside or inline with your hands. If it begins
to travel behind your hands at this point, try and keep it inside your right
hip. The better golfer can play fine golf from this position, but it will
tend to cause shots that work from right to left as the swing path on the
way down will be somewhat more in to out. The most common tendency I see during
the takeaway is for the golfer to get the club way too far behind their right
hip during this point of the swing.
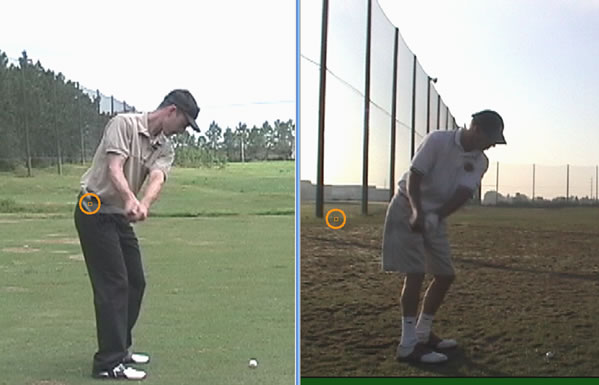
In the side by side shot below, you can see the two extremes. In the picture on the left, the clubhead has traveled back behind the hands but is still inside the right hip when the club is parallel to the ground. This is perfectly acceptable as long as the tendencies are understood and this position can be repeated by the golfer on every swing. In fact, Ben Hogan and Sam Snead both got the club behind their hands during this stage in the swing as you can see from the pictures below. On the right hand side, you can see a golfer who has taken the club away with a very handsy action and a clockwise rotation of the left forearm that has pulled the club away dramatically to the inside. This is a difficult position to play from consistently for the average golfer. It will typically require the golfer to have a very handsy, active release through impact to square the clubface, rather than the more desirable and repeatable passive release where the arms and hands do nothing. Golfers who take the club this far to the inside will tend to either hit very big hooks or blocks, or they will come down steeply from the top and pull cut the ball.
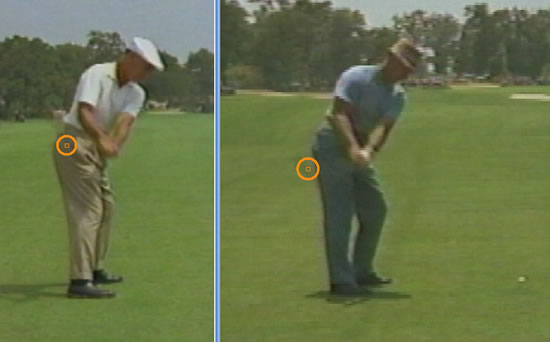
In the picture below, you can see that both Ben Hogan and Sam Snead let the club get behind their hands during the takeaway, Snead more so than Hogan.
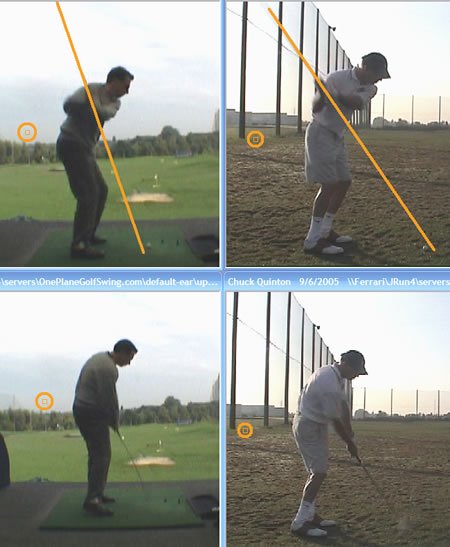
To further illustrate this, study the photos below. During this phase of the takeaway, the two golfers are in very similar positions. Both have swept the club away abruptly to the inside and have the club well behind their right hip. However, from here, they take decidedly different paths to get the club back to the ball and they illustrate perfectly the two most common tendencies from this takeaway position.
To complete the backswing, the golfer on the left will lift his arms high above his head to get in a position that feels powerful. This will, in essence, put him in a classic two plane position at the top with the club directly above the right shoulder and high above his head. The golfer on the right properly relies on more rotary power rather than lifting his arms and continues to swing the club around his body rather than up. At the top, he ends up in a more one plane position and this is what differentiates their downswing approaches to the ball that you can see in the next set of photos.
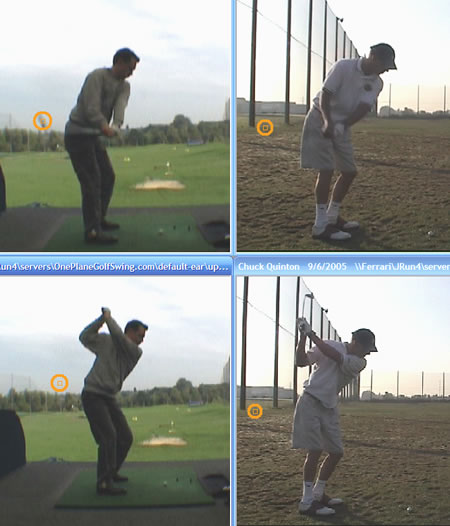
As they start their downswings, the golfer on the left gets the club very steep because of his "high hands" top of the swing position. He is also standing too close to the ball at address which has also affected his entire swing and will cause him to have a very steep swing path to get back to the ball. The golfer on the right has given himself more room to swing the club around his body and will be able to bring the club in on a shallower path.
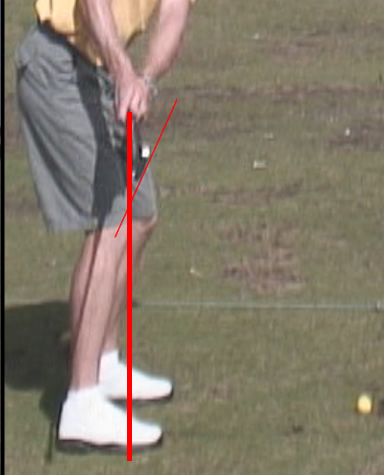
There are many ways to take the club back and each different way will cause different tendencies in the swing. My goal in working with a student on his takeaway is to make it very simple and "quiet." I don't like to see a lot of manipulations during the takeaway, I'd rather see the club working back quietly on its natural path. The takeaway photo below demonstrates what this looks like. Here, you can see the club is inline with his hands and the clubface is remained more square to the shaft plane it traveled up on, rather than being in a "toe-up" position, which requires the golfer to rotate and manipulate the club with the hands.
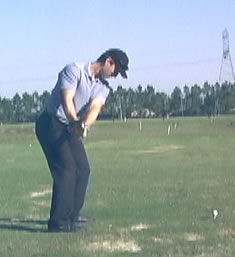
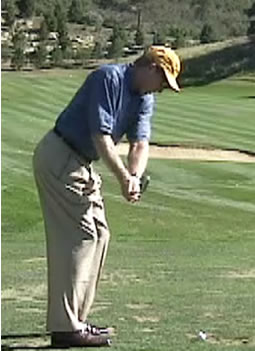
In the second photo with a driver, you can get a full view of everything working back together. Note that the right elbow is beginning to hinge up and behind him rather than being extended straight. Even more bend in the right elbow is acceptable here as it will reduce width in the swing and help the club begin to work back more to the inside. The club has stayed in line with the hands and is working to the inside. I like to see the club somewhat over the instep or balls of the feet with the left arm angled into the body at this point, rather than seeing the club out past the toes as you can see in the picture of Grant Waite to the right. The left arm should be connected to the chest and swinging across the body rather than out in front. Understanding the takeaway and its importance will help put you on the right path to a sound and repeatable golf swing. But if you start out on the wrong path, it will put elements into your swing that will require compensatory moves that may make it more difficult for you to have a repetitive swing. The ideal goal in the takeaway should be to keep it as simple, natural and quiet as possible.
|
|
|
| ||||||||

